 العربية
⬜ Quick Start Guide for Internal Setup in Hyper Aurest
This guide outlines the essential steps to configure the Hyper Aurest system before launching operations in your restaurant or café. The setup process is divided into three main stages: front-of-house configuration, item & menu setup, and customer & payment management. Following this sequence ensures a smooth and efficient start to operations.
1️⃣ Front-of-House Configuration
✅ Goal: Set up the service area and link it to captains, tables, and printers.
➤ Captain Card
Captains are responsible for entering orders inside the service area using the Captain App.
-
Navigate to ➤ Entries ➤ Captain Card.
-
Enter the captain's name and password.
-
Define the appropriate permissions (e.g., modify orders, delete items).
-
Add a barcode if available.
-
Click ✔️ "Add New After Saving".
➤ Hall Card
A hall represents a customer service area (e.g., Family Hall, Outdoor Area).
-
Go to ➤ Entries ➤ Hall Card.
-
Enter the hall name, assign captains, and select a linked printer.
-
Set the number of print copies per order.
- Click ✔️ "Add New After Saving".
➤ Table Card
Tables are defined within each hall and configured by seating capacity and order.
-
Go to ➤ Entries ➤ Table Card.
-
Add table name (e.g., T01), number of seats, and maximum capacity.
-
Choose the associated hall and set display order.
-
Click ✔️ "Add New After Saving".


2️⃣ Item & Menu Setup
✅ Goal: Build a professional menu with complete product details, modifiers, and offers.
➤ Preparation Materials
These are the raw ingredients used in preparing menu items (e.g., Cheese, Flour, Oil).
-
Navigate to ➤ Entries ➤ Preparation Materials.
-
Add the material name, unit (e.g., kg, liter), price, and family.
-
Click ✔️ "Add New After Saving".
➤ Categories
Categories help organize items into logical groups (e.g., Drinks, Meals, Sauces).
-
Go to ➤ Entries ➤ Categories.
-
Add the category name and optional notes.
-
Click ✔️ "Add New After Saving".
➤ Menus
Menus allow you to define different offerings for specific times or services (e.g., Breakfast Menu, Delivery Menu).
-
Go to ➤ Entries ➤ Menus.
-
Add the menu name, activation status, and any notes.
-
Click ✔️ "Add New After Saving".
➤ Item Groups
Groups are used to cluster related items under a section in the POS (e.g., Appetizers, Hot Drinks).
-
Navigate to ➤ Entries ➤ Item Groups.
-
Enter the group name, determine if it's a main or sub-group, and select a linked menu.
-
Set the display order and notes if needed.
-
Click ✔️ "Add New After Saving".
➤ Printer Card
This links the system to section-specific printers (e.g., Kitchen, Bar, Barcode).
-
Navigate to ➤ Entries ➤ Printer Card.
-
Add printer name, location (internal/external), and number of copies.
-
Click ✔️ "Add New After Saving".
➤ Item Card
Used to define each product that appears on the menu.
-
Go to ➤ Entries ➤ Items.
-
Add item name, group, category, linked printer, price, and item type.
-
Set any modifiers, display options, warnings, or combo components.
-
Click ✔️ "Add New After Saving".
➤ Item Modifiers
Modifiers are extras or customizations tied to items (e.g., Extra Cheese, No Onions).
-
Go to ➤ Entries ➤ Item Modifiers.
-
Add modifier name, order, and optional notes.
-
Click ✔️ "Add New After Saving".
➤ Offers
Create time-based or recurring discounts on items or groups.
-
Go to ➤ Entries ➤ Offers.
-
Add offer name, schedule (all day or timed), start and end dates.
-
Set recurrence days, include items or groups, and enter notes.
-
Activate the offer, then click ✔️ "Add New After Saving".
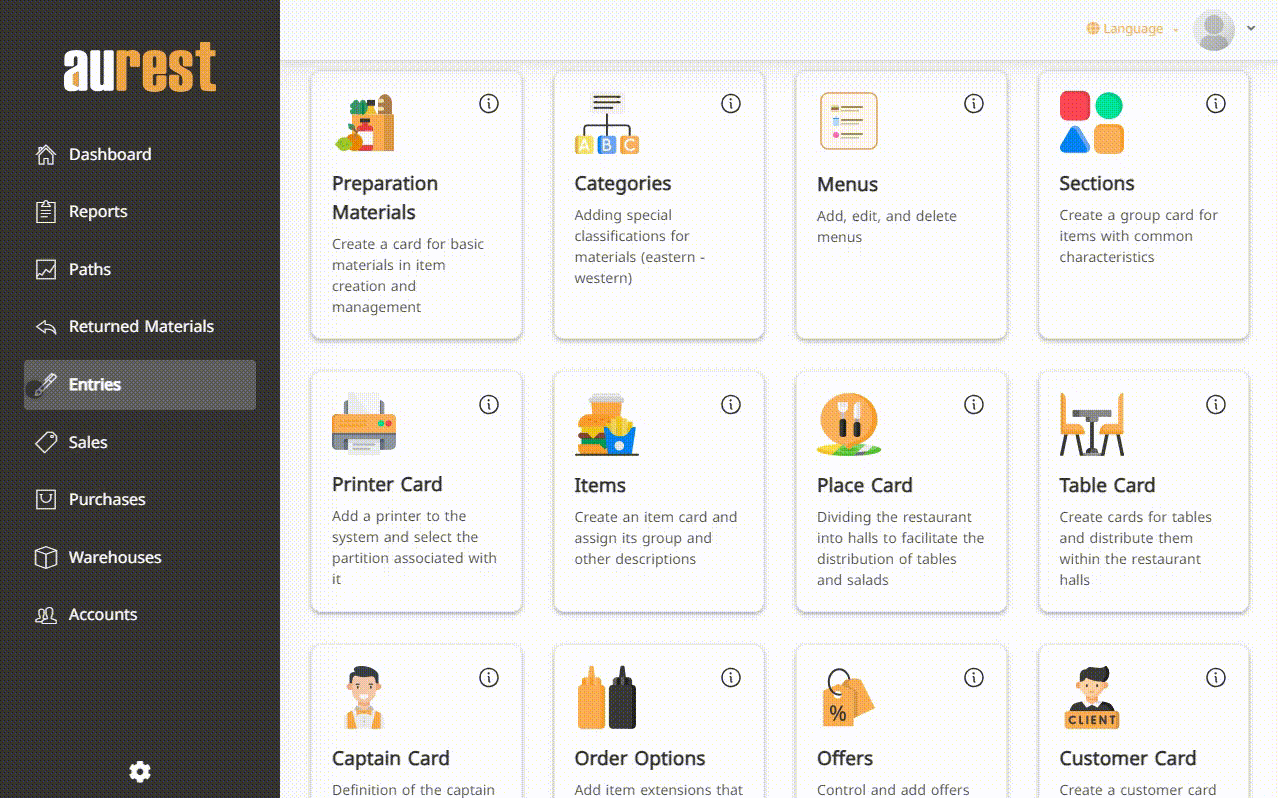

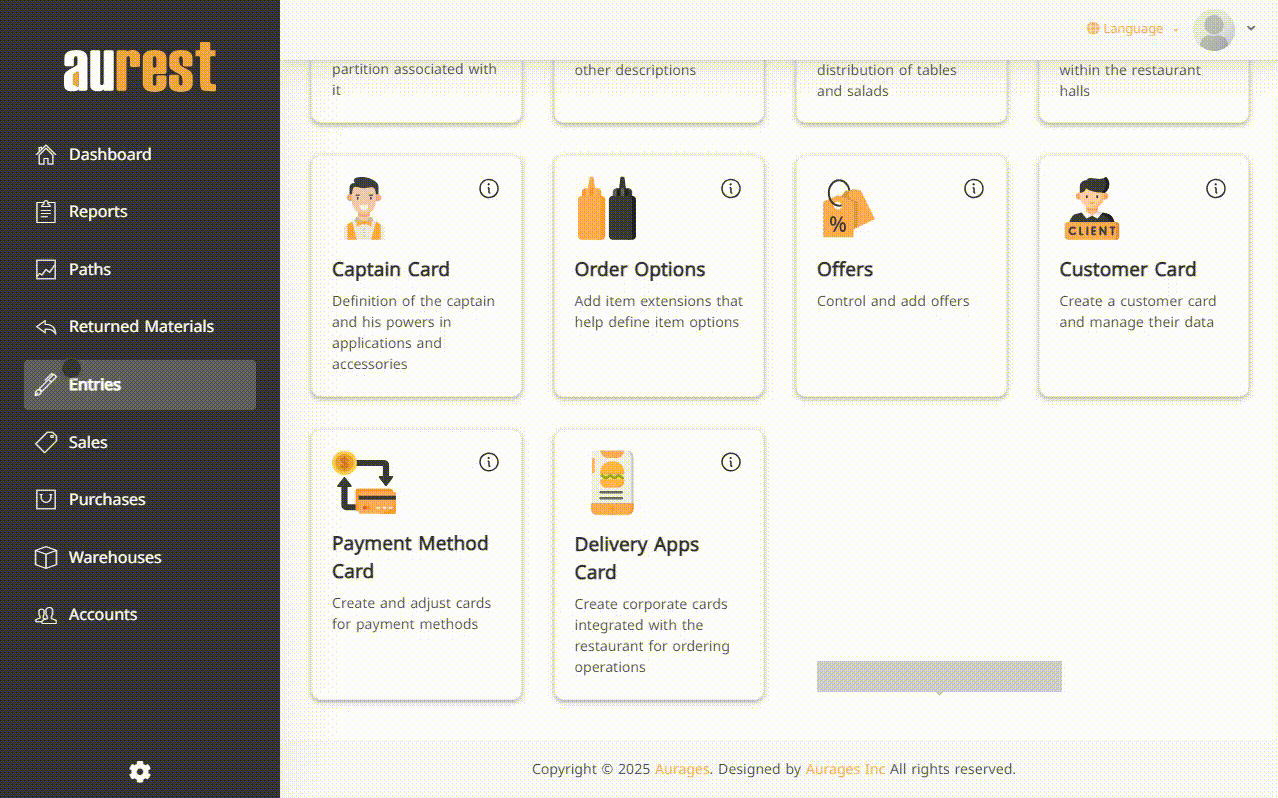
3️⃣ Customer & Payment Management
✅ Goal: Register customer data, configure order channels, and enable flexible payment options.
➤ Customer Card
Stores client details, whether individuals or businesses.
-
Navigate to ➤ Entries ➤ Customer Card.
-
Add customer name, email, phone, address type, and address.
-
Enter tax and commercial registration numbers if applicable.
-
Add a call token for queue management (optional).
-
Click ✔️ "Add New After Saving".
➤ Payment Methods Card
Defines the payment types accepted in the system (e.g., Cash, Card, Digital Wallet).
-
Go to ➤ Entries ➤ Payment Methods Card
-
Add payment name and type (cash, electronic, credit).
-
Set currency conversion if needed.
-
Mark it as "Default" or enable for reservations.
-
Click ✔️ "Add New After Saving".
➤ Delivery Apps Card
Used to define third-party delivery partners (e.g., Talabat, Jahez, Careem).
-
Navigate to ➤ Entries ➤ Delivery Apps Card.
-
Add company name, commission percentage, and optional notes.
-
Click ✔️ "Add New After Saving".
✨ Final Outcome:
○ Fully ready to receive dine-in and delivery orders.
○ Organized and professional menu reflecting the full product range.
○ Clear control over tables, printers, and captain roles.
○ Flexible setup for item options, combos, and promotions.
○ Integrated payment and order tracking for smoother operations.