⬜ Item & Menu Setup in Hyper Aurest
In this phase, the user begins building the restaurant or café's menu by adding items, organizing them into groups and categories, and configuring item modifiers, preparation materials, offers, and menus. This setup forms the foundation for all sales operations within the system.
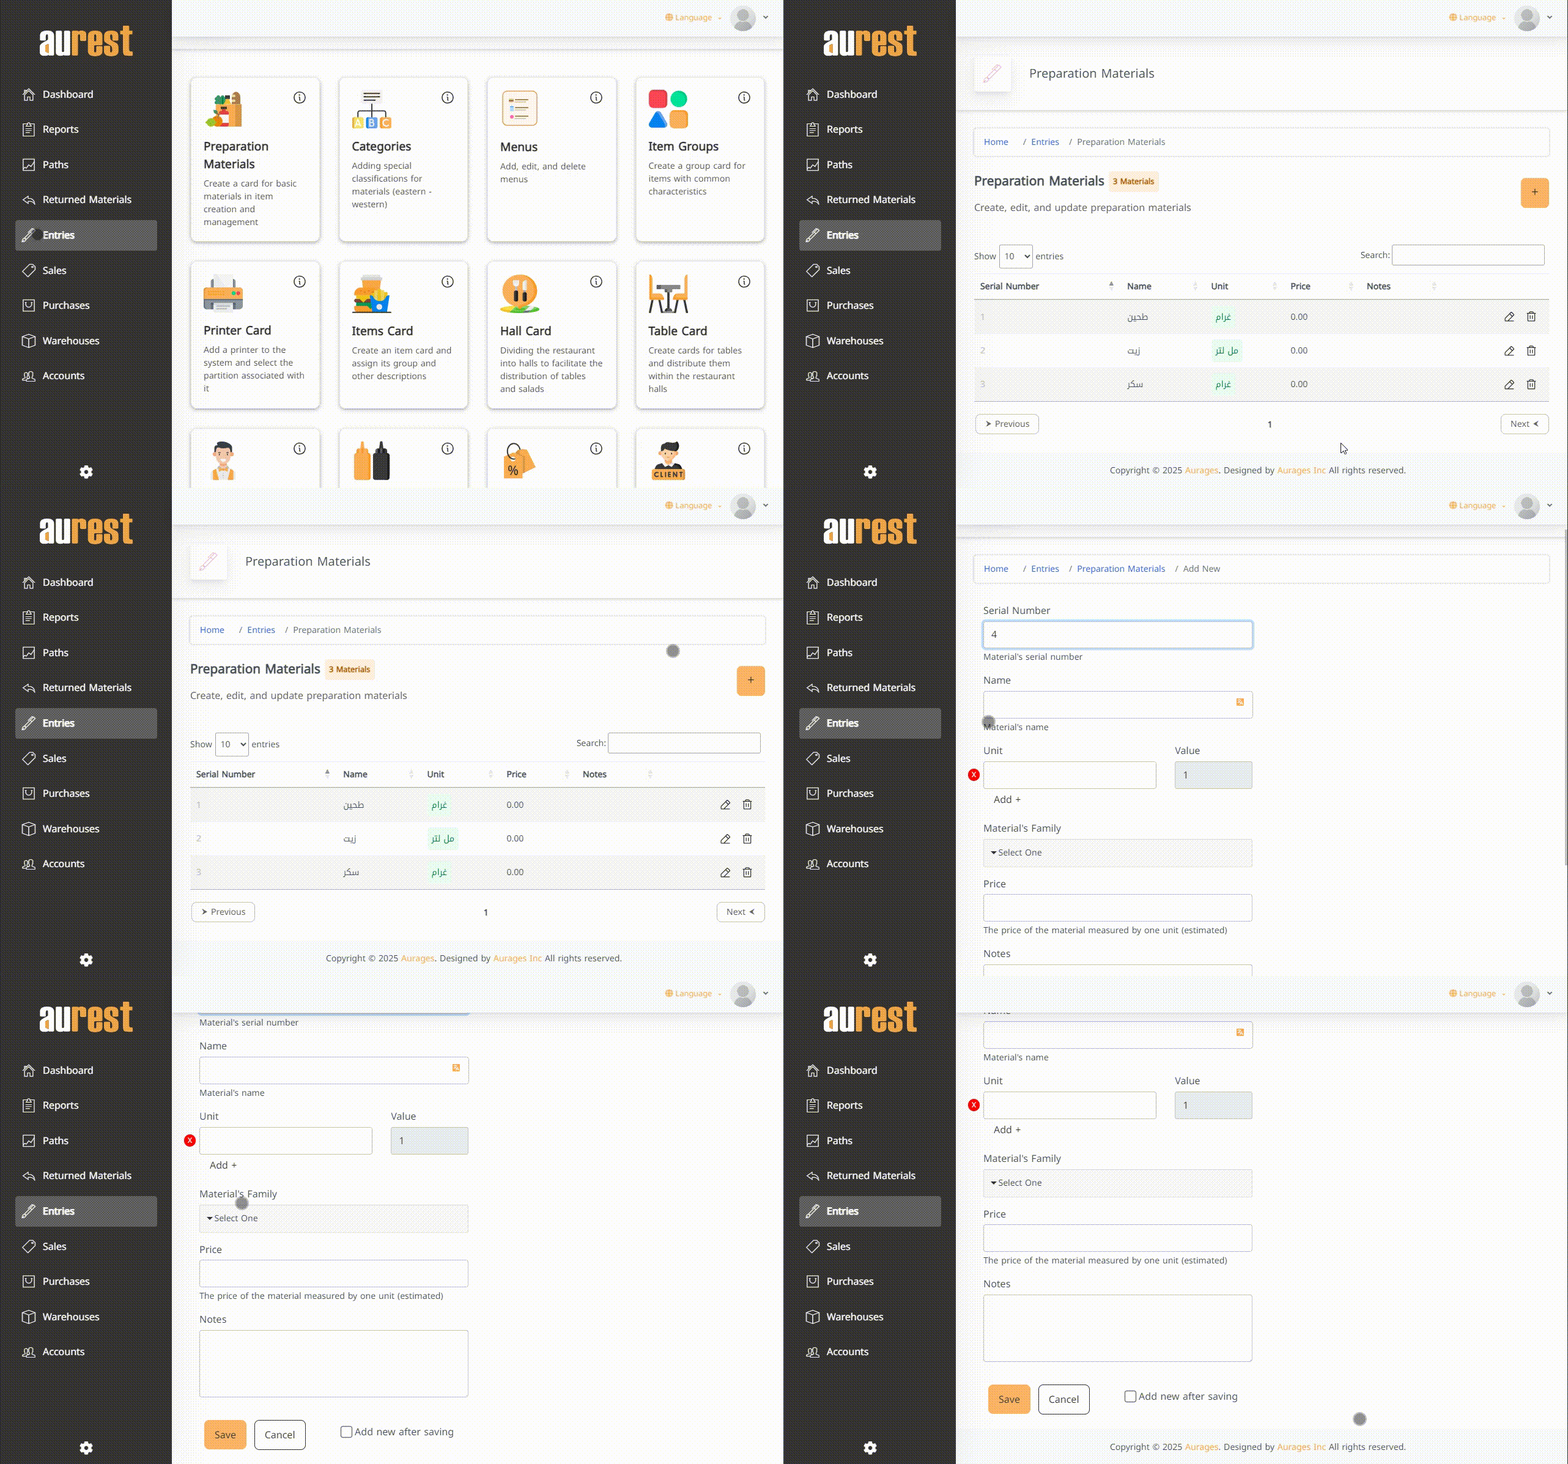
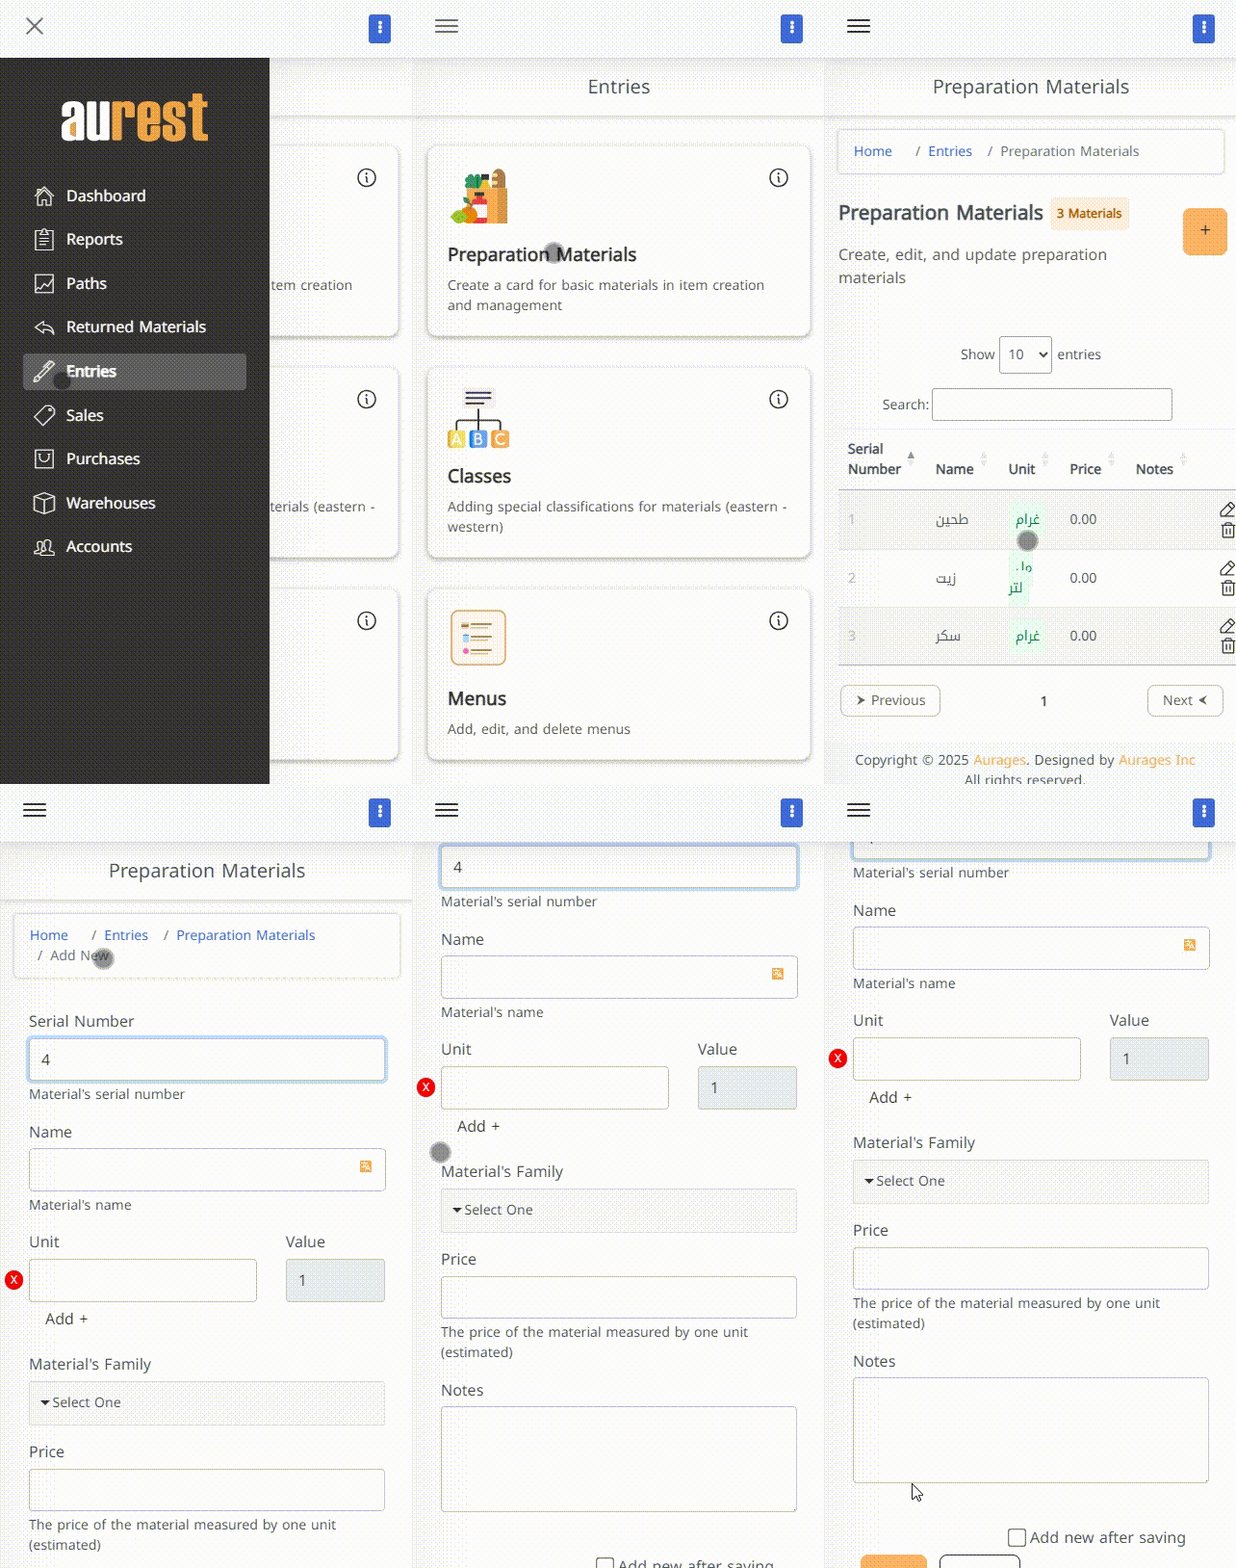
1️⃣ Preparation Materials
✅ What are Preparation Materials?
These are the core ingredients used to prepare items (e.g., Cheese – Flour – Oil).
✅ Steps to Add a Preparation Material:
-
From the side menu ➤ Entries ➤ Preparation Materials.
-
Click the ➕ button to add a new material.
-
Fill in:
-
Material name.
-
Unit (e.g., kg – liter).
-
Estimated unit price.
-
Associated family (e.g., Vegetables, Fruits, Grains).
-
Notes (optional).
-
- Click ✔️ Add New After Saving.
2️⃣ Categories
✅ What are Categories?
Used to classify items into logical sections (e.g., Drinks – Food – Sauces), making the menu more organized.
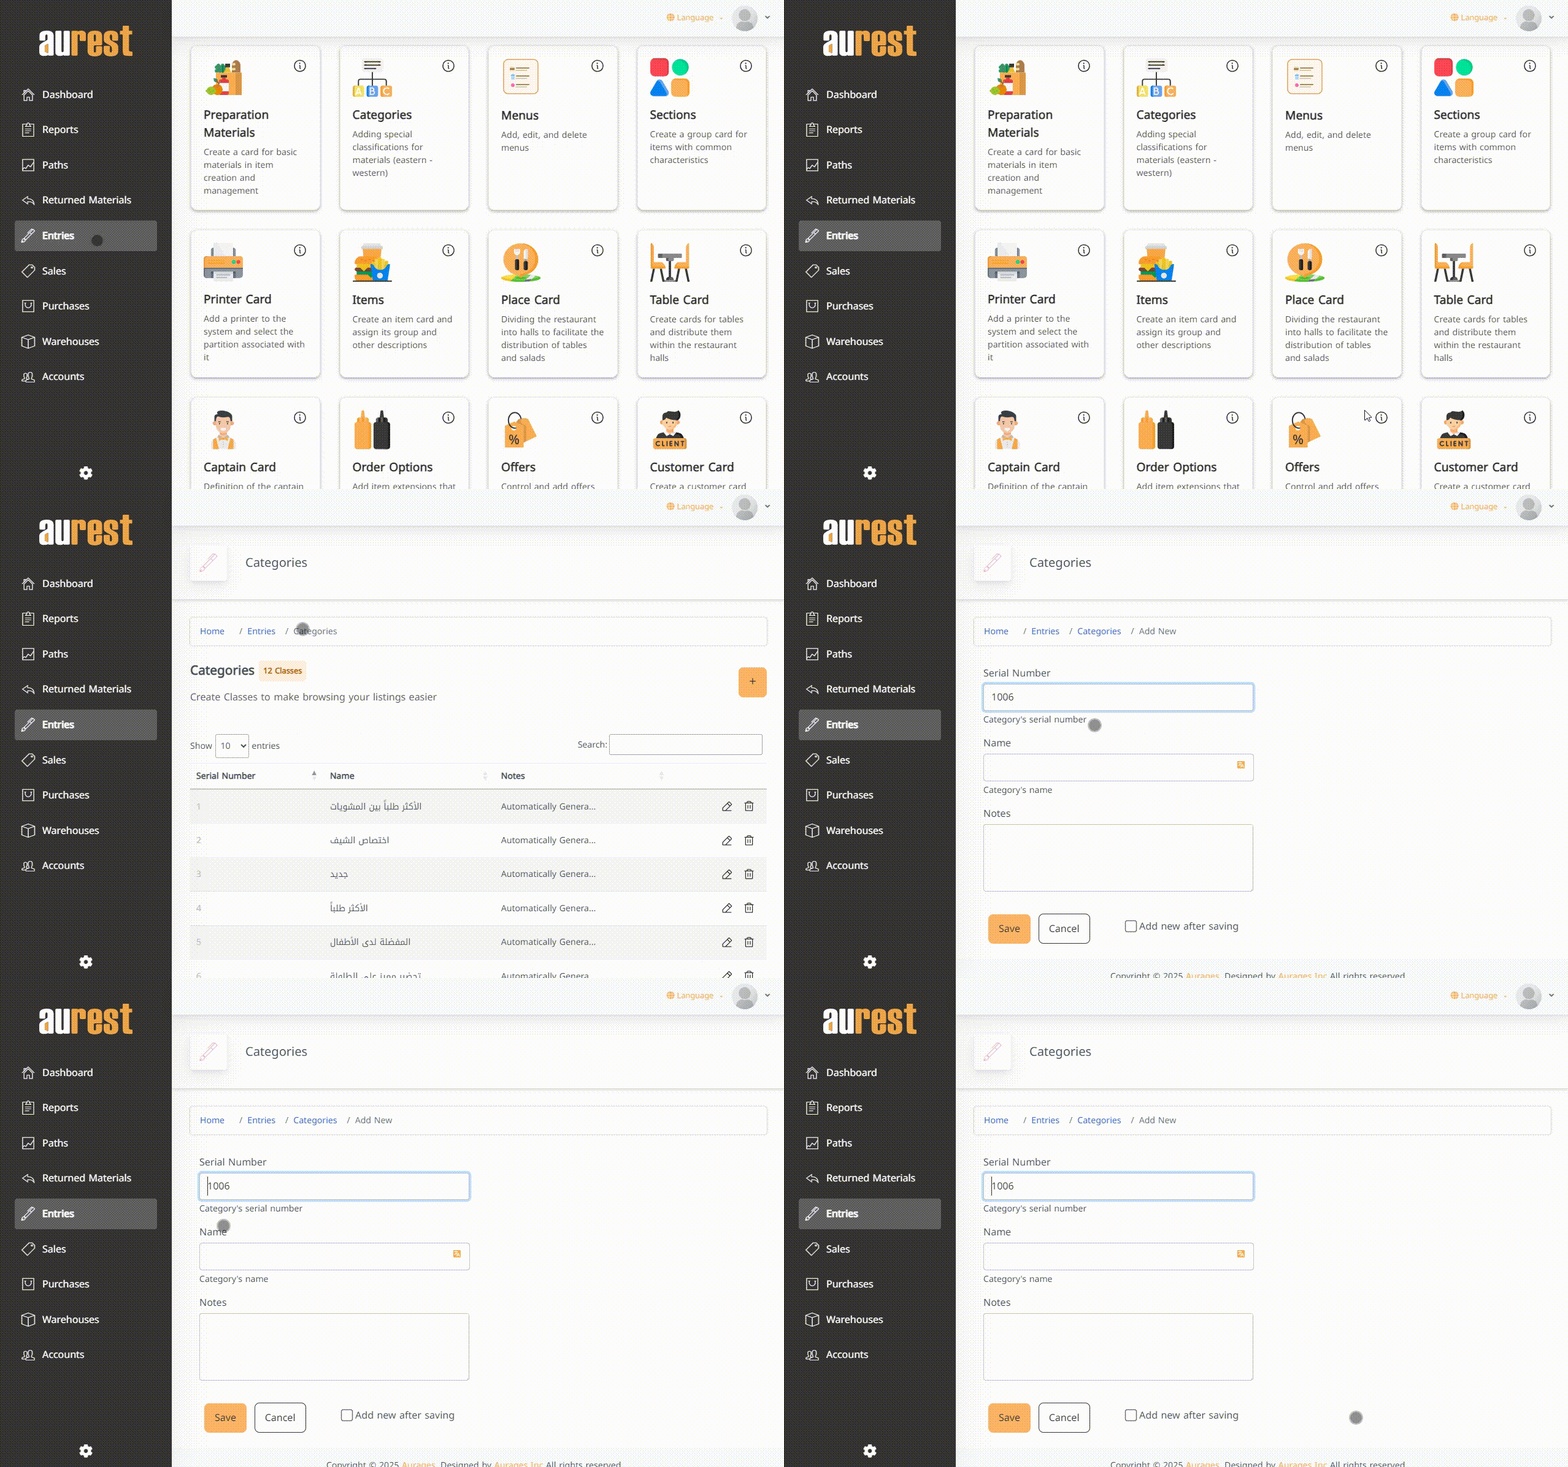
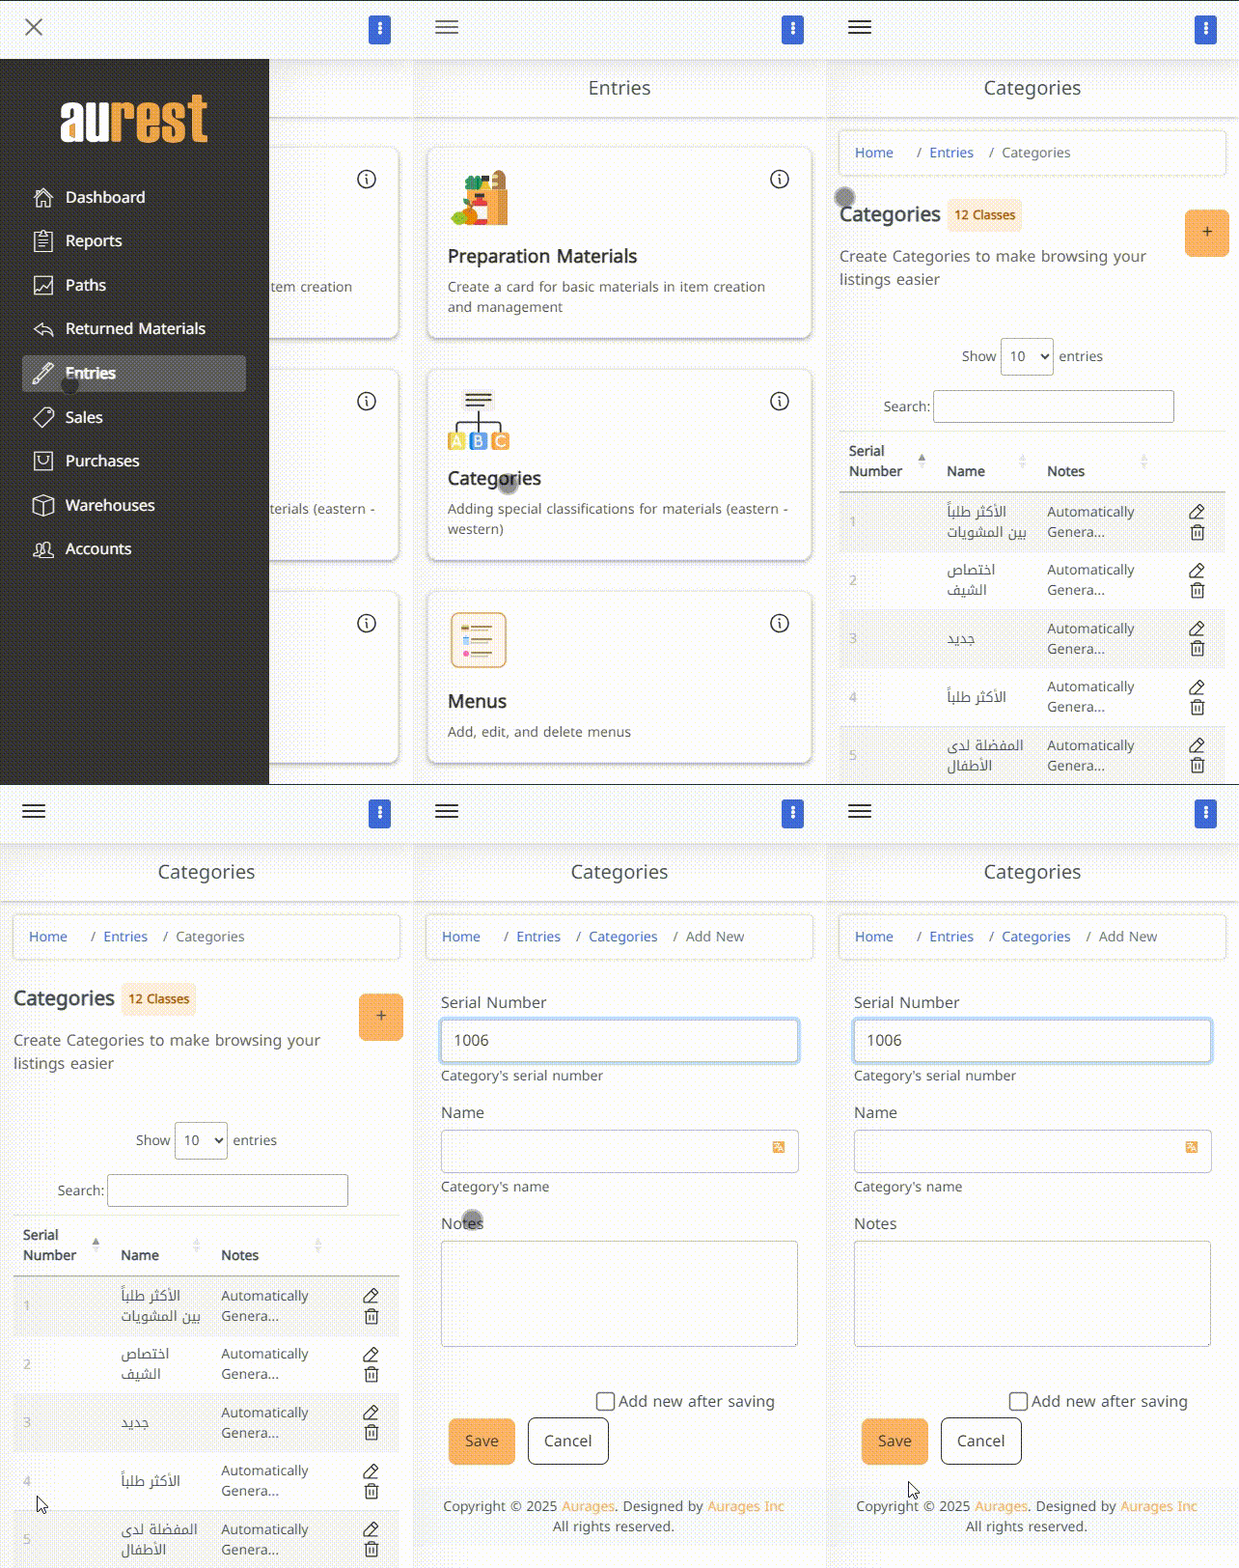
✅ Steps to Add a New Category:
-
From the side menu ➤ Entries ➤ Categories.
-
A list of all existing categories will appear.
-
Click the ➕ button to add a new category.
-
Enter the category name and notes (optional).
- Click ✔️ Add New After Saving.
3️⃣ Menus
✅ What are Menus?
Menus allow you to show different offerings based on time or service type (e.g., Breakfast Menu – Delivery Menu).
✅ Steps to Set Up a Menu:
-
From the side menu ➤ Entries ➤ Menus.
-
Click the ➕ button to add a new menu.
-
Enter the menu name and notes.
-
Define its activation status.
- Click ✔️ Add New After Saving.


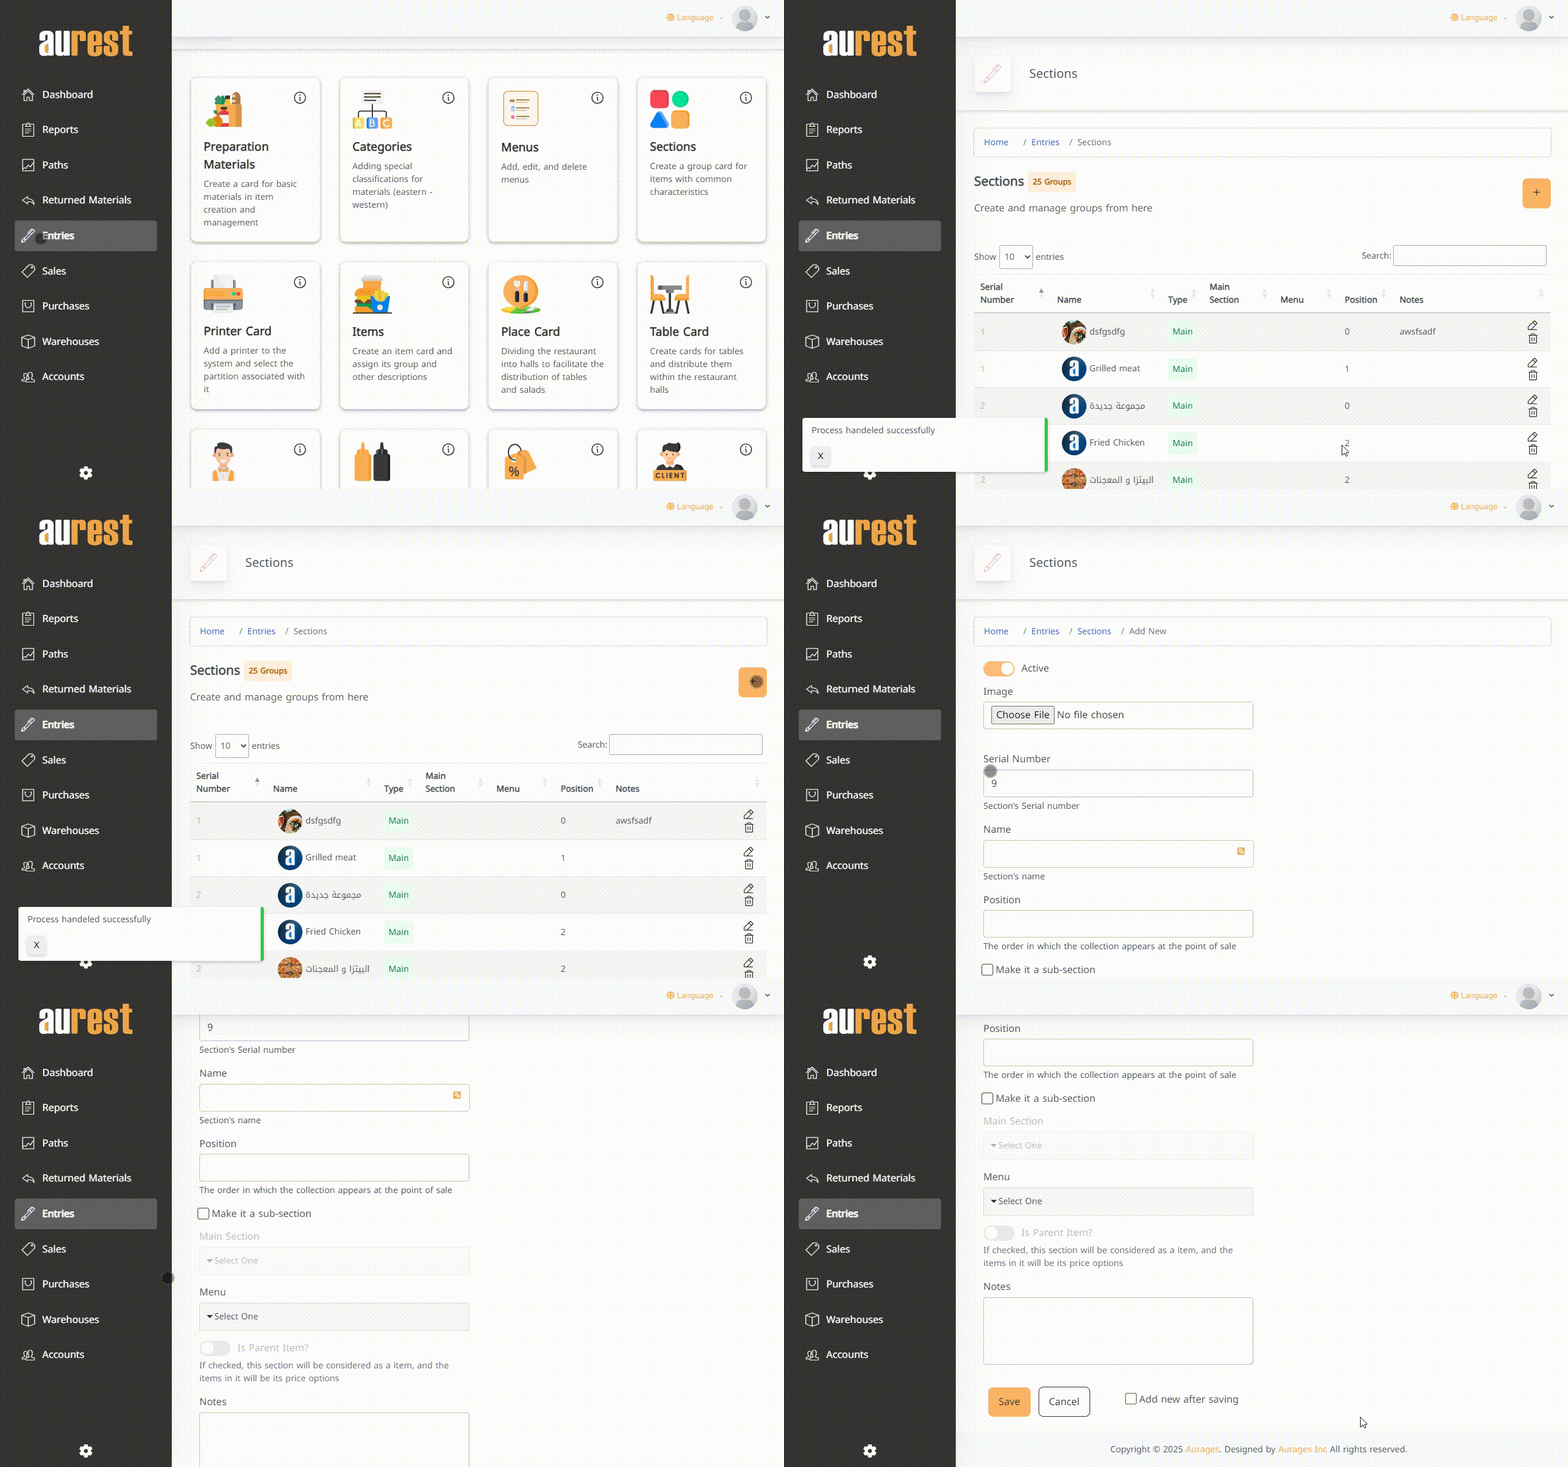
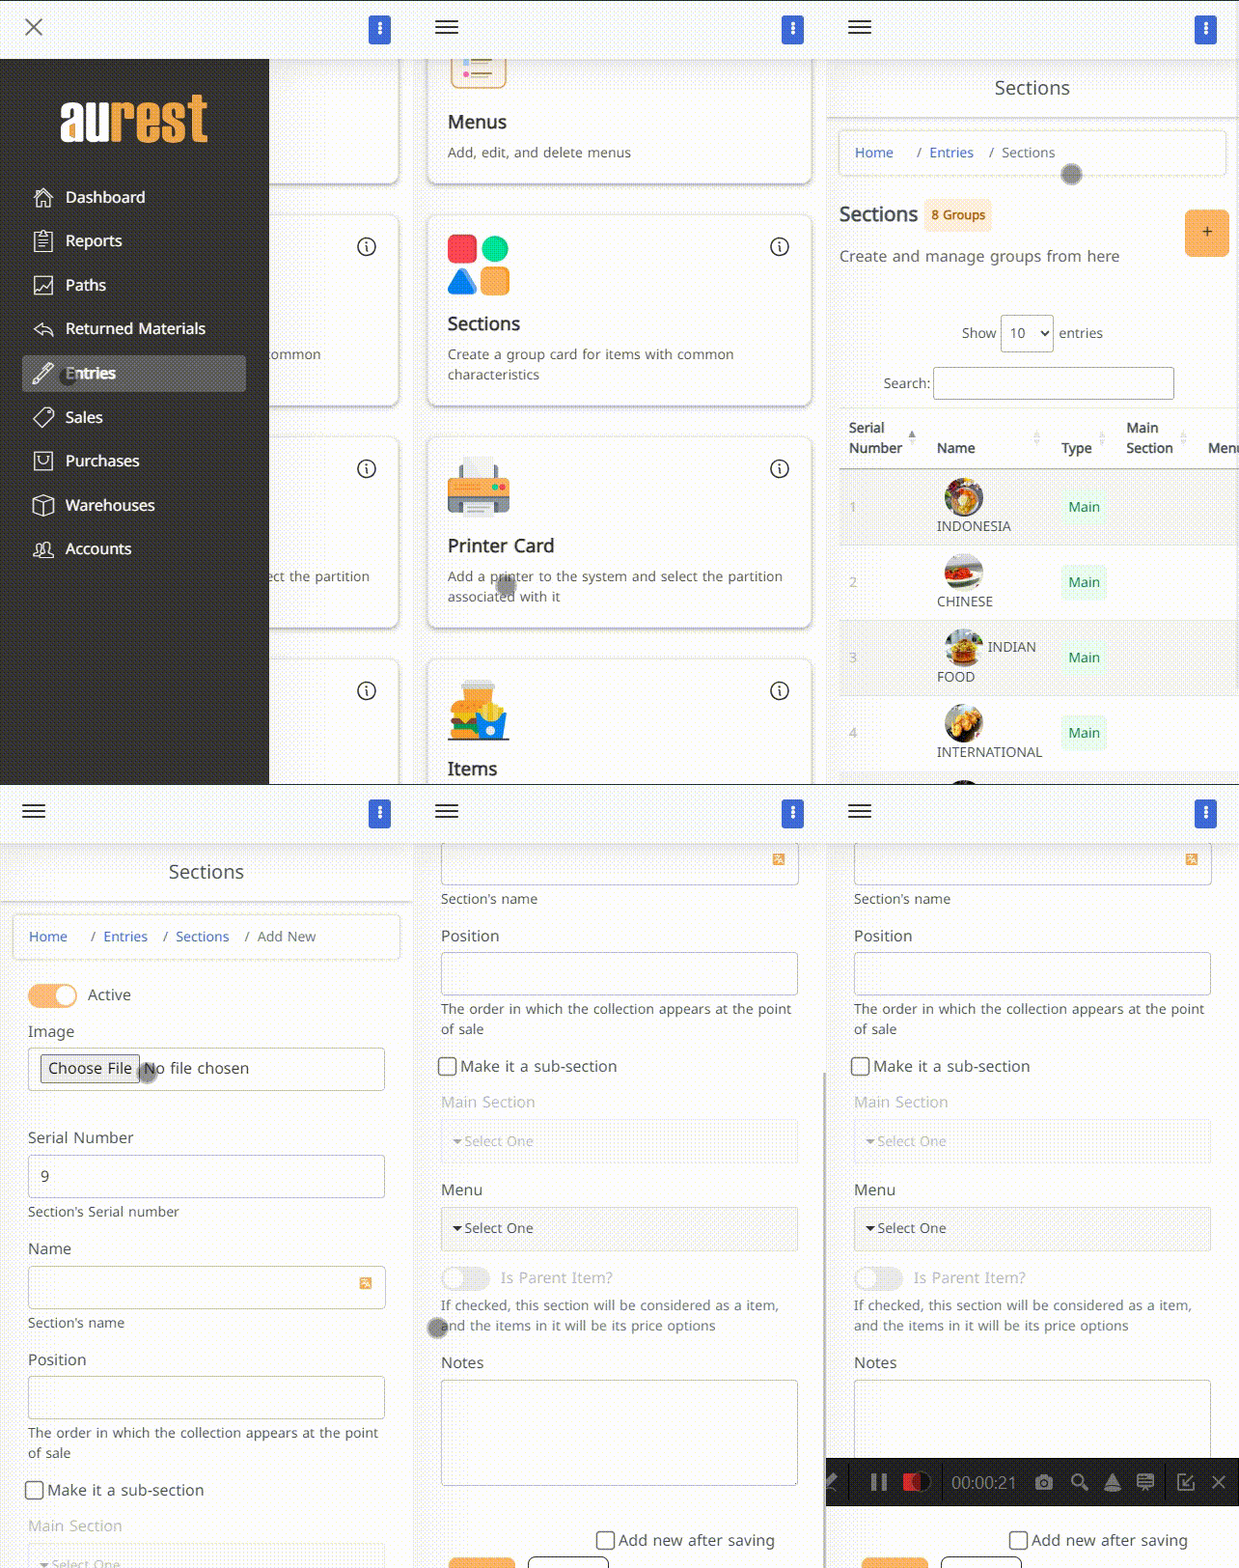
4️⃣ Sections
✅ What are Sections?
Used to group multiple items under one section visible at the POS (e.g., Appetizers – Hot Drinks).
✅ Steps to Add a New Section:
-
Go to ➤ Entries ➤ Sections.
-
A list of existing Sections will appear.
-
Click the ➕ button to add a new Section.
-
Fill in:
-
Section name.
-
Whether it's a main or sub-Section.
-
Linked menu.
-
Display order.
-
Notes (optional).
-
- Click ✔️ Add New After Saving.
5️⃣ Printer Card
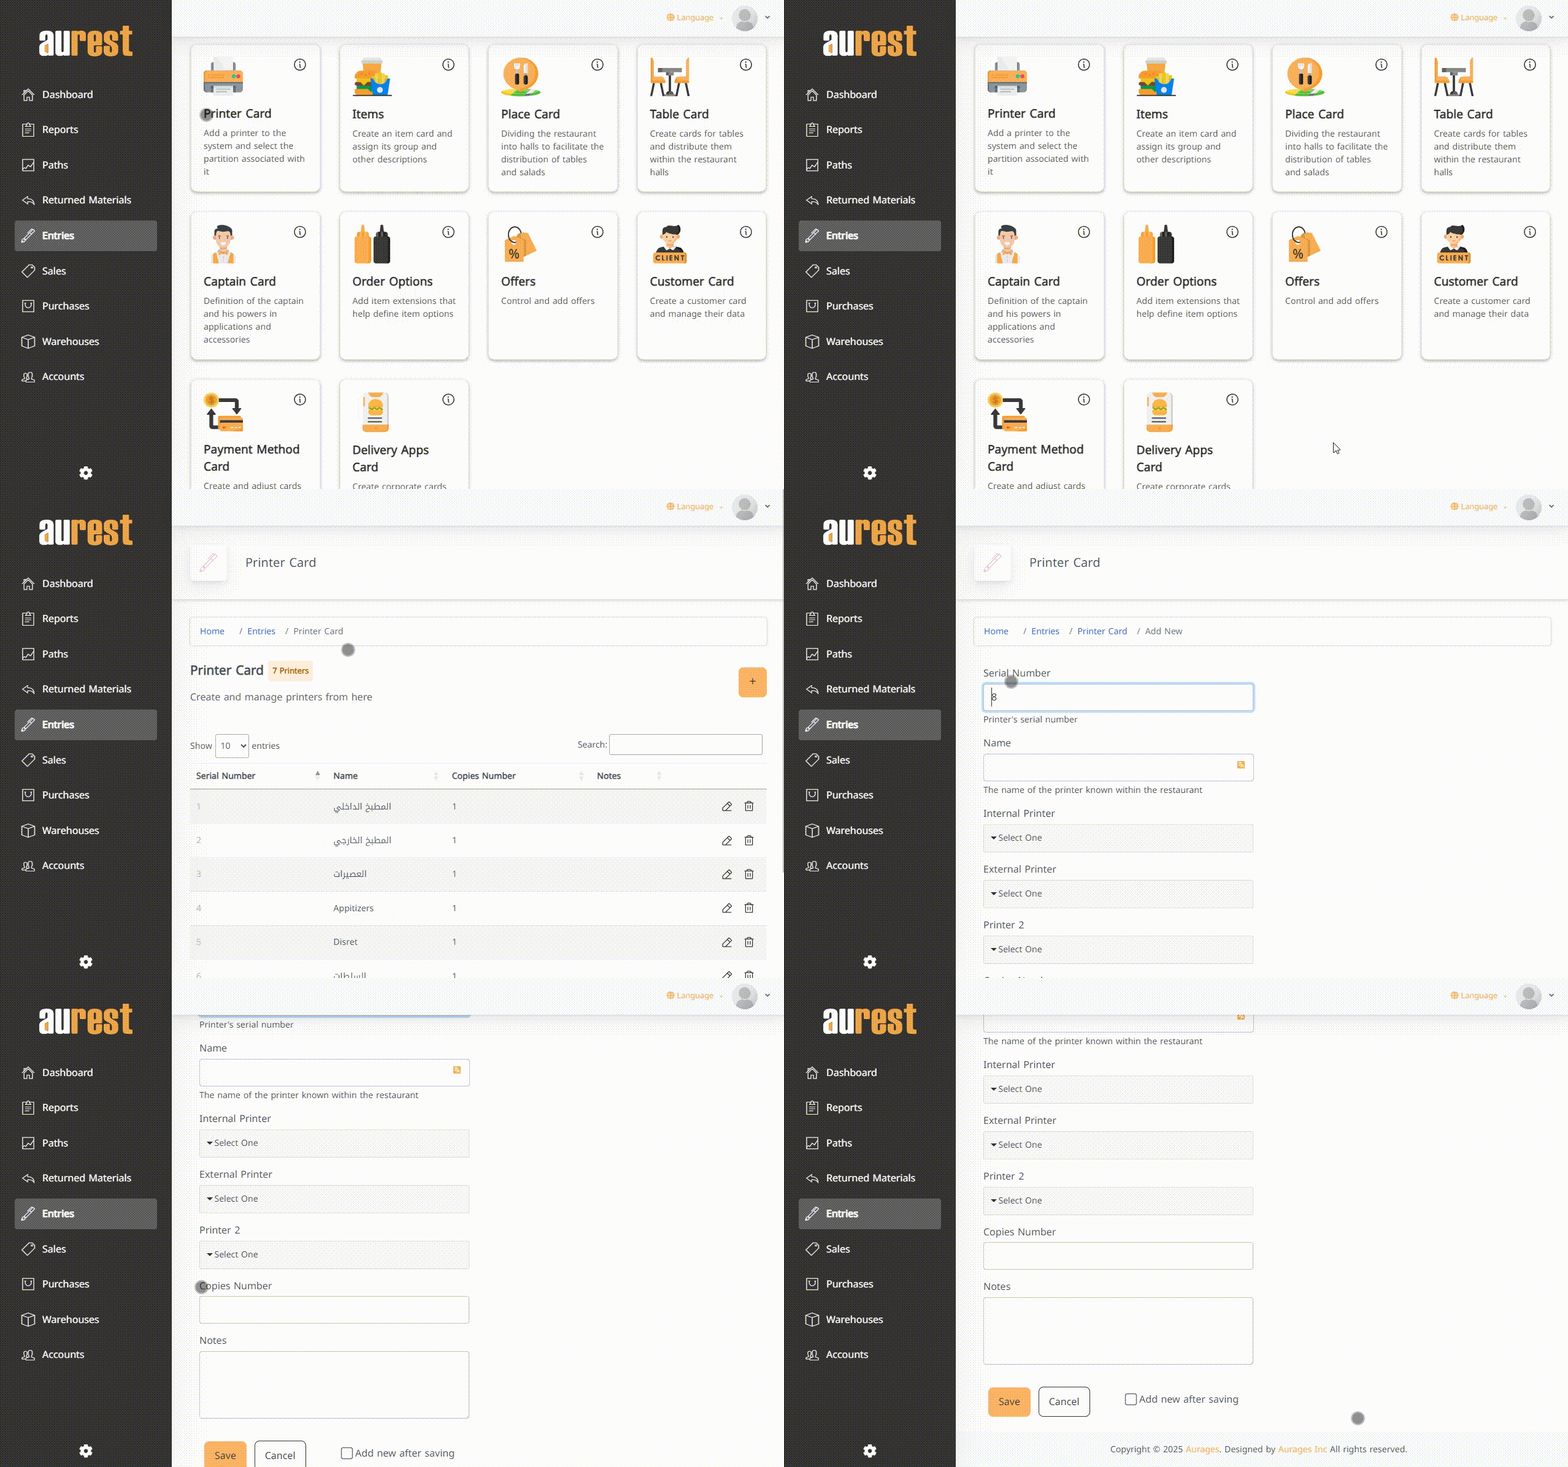
✅ What is a Printer Card?
Used to link the system to different printers in the restaurant, such as kitchen or barcode printers.
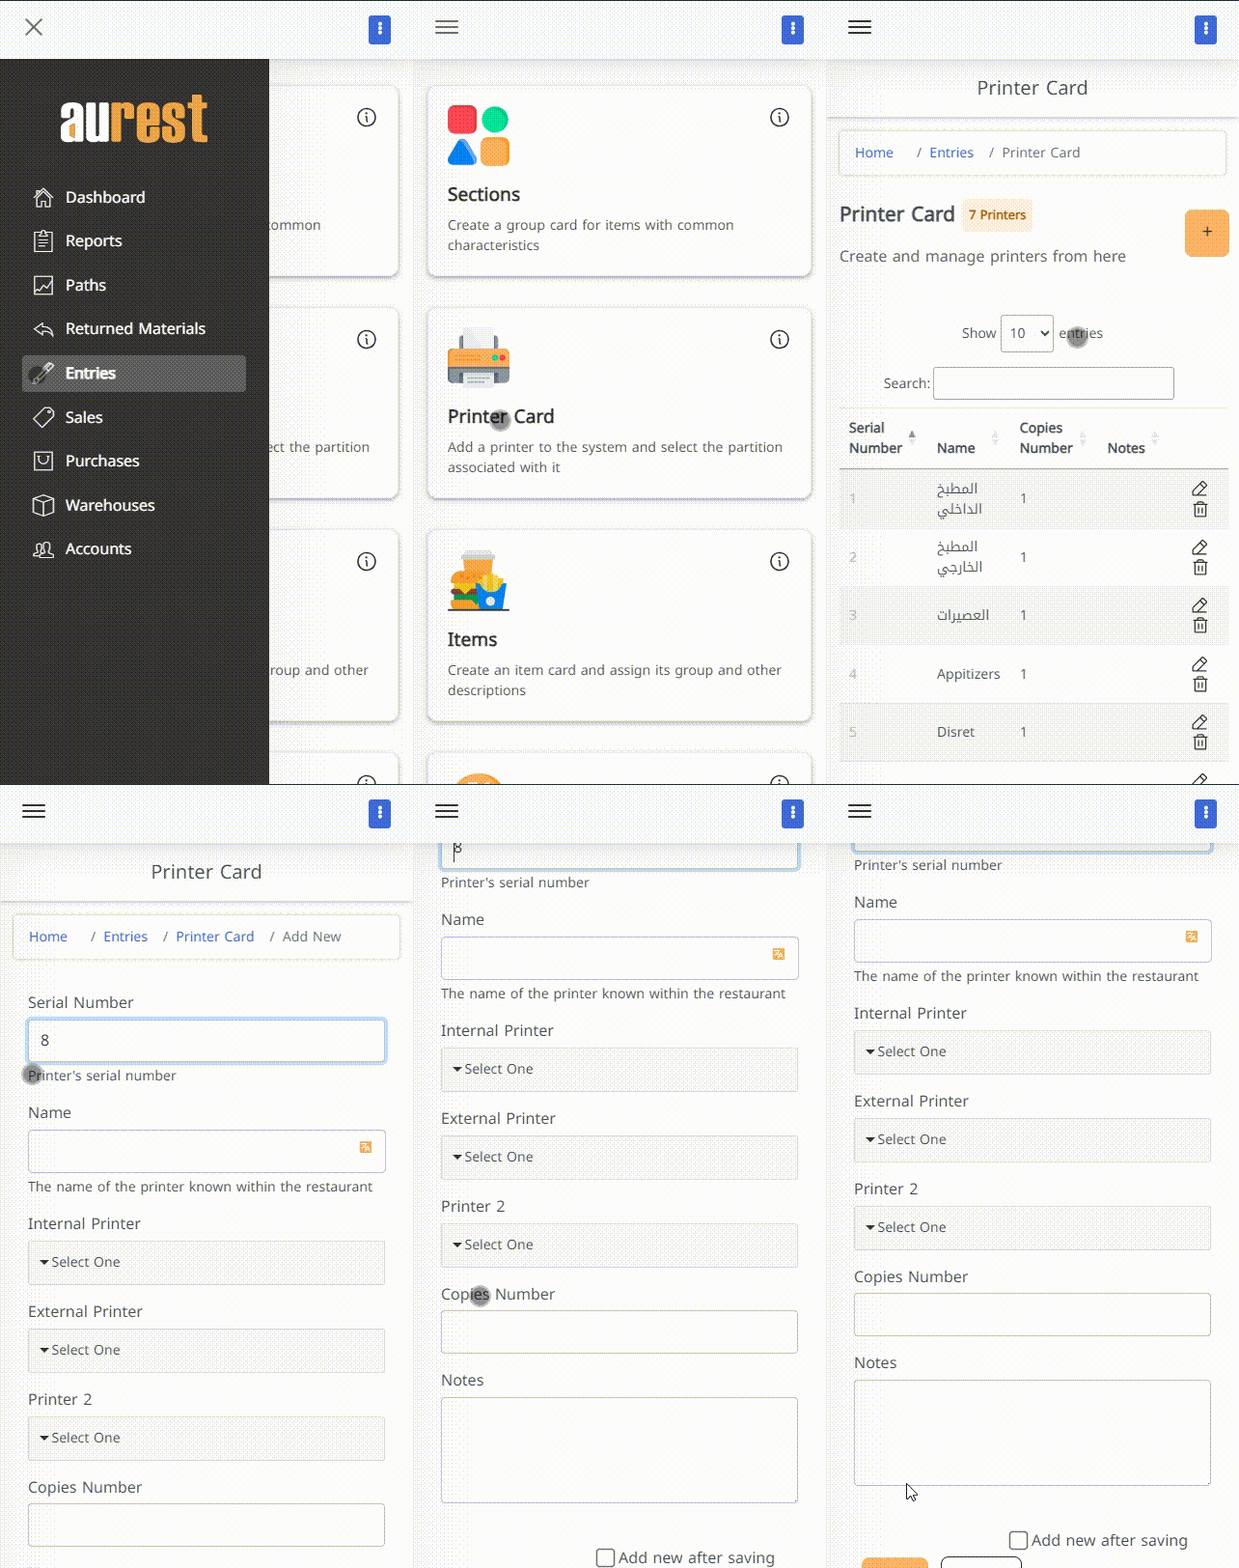
✅ Steps to Add a Printer:
-
Go to the side menu ➤ Entries ➤ Printer Card.
-
A list of current printers will appear.
-
Click the ➕ button to add a new printer.
-
Fill in the following information:
-
Printer Name: e.g., “Main Kitchen”.
-
Internal/External/Printer 2: Choose the relevant option from the dropdown.
-
Number of Copies: Number of copies to be printed per transaction.
-
Notes: (Optional).
-
- Click ✔️ Add New After Saving.
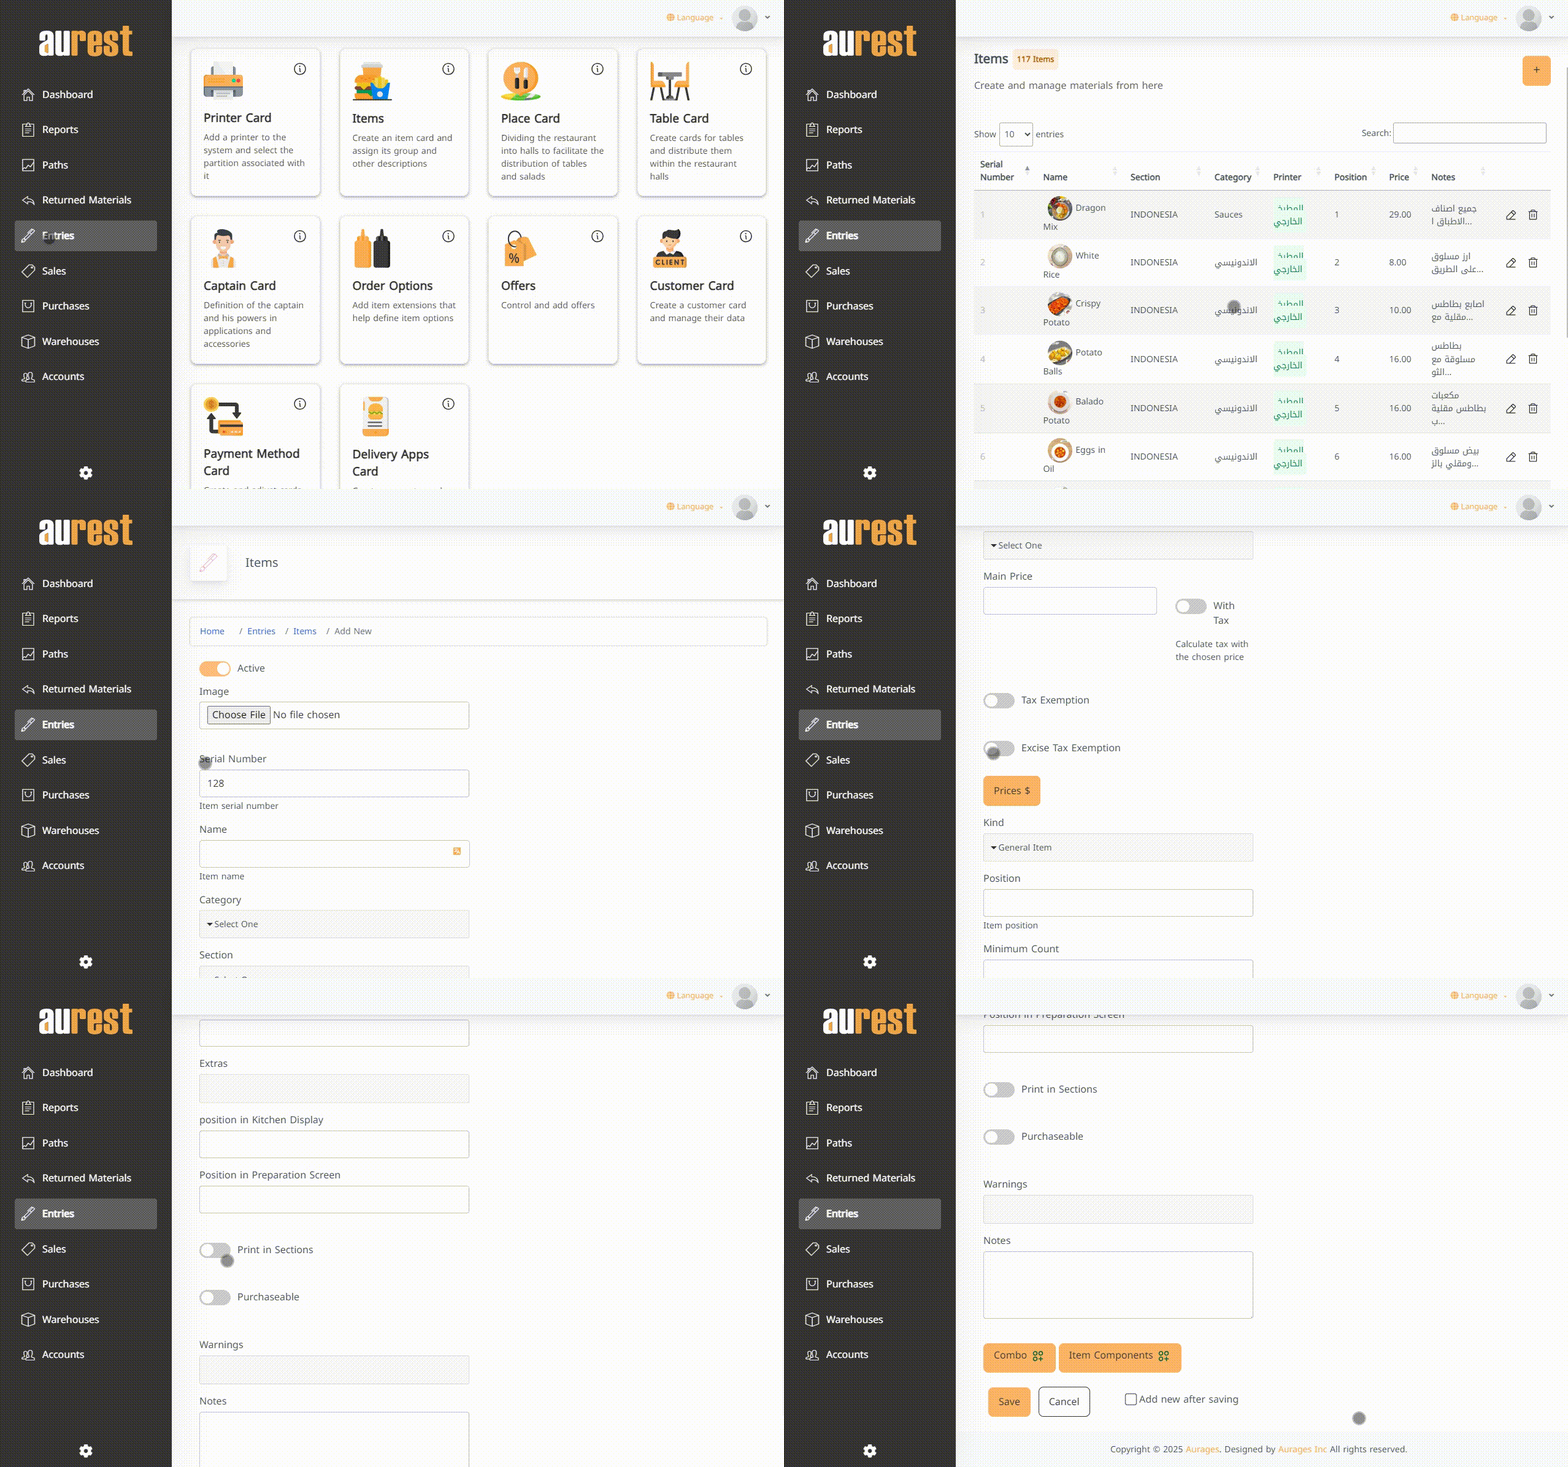
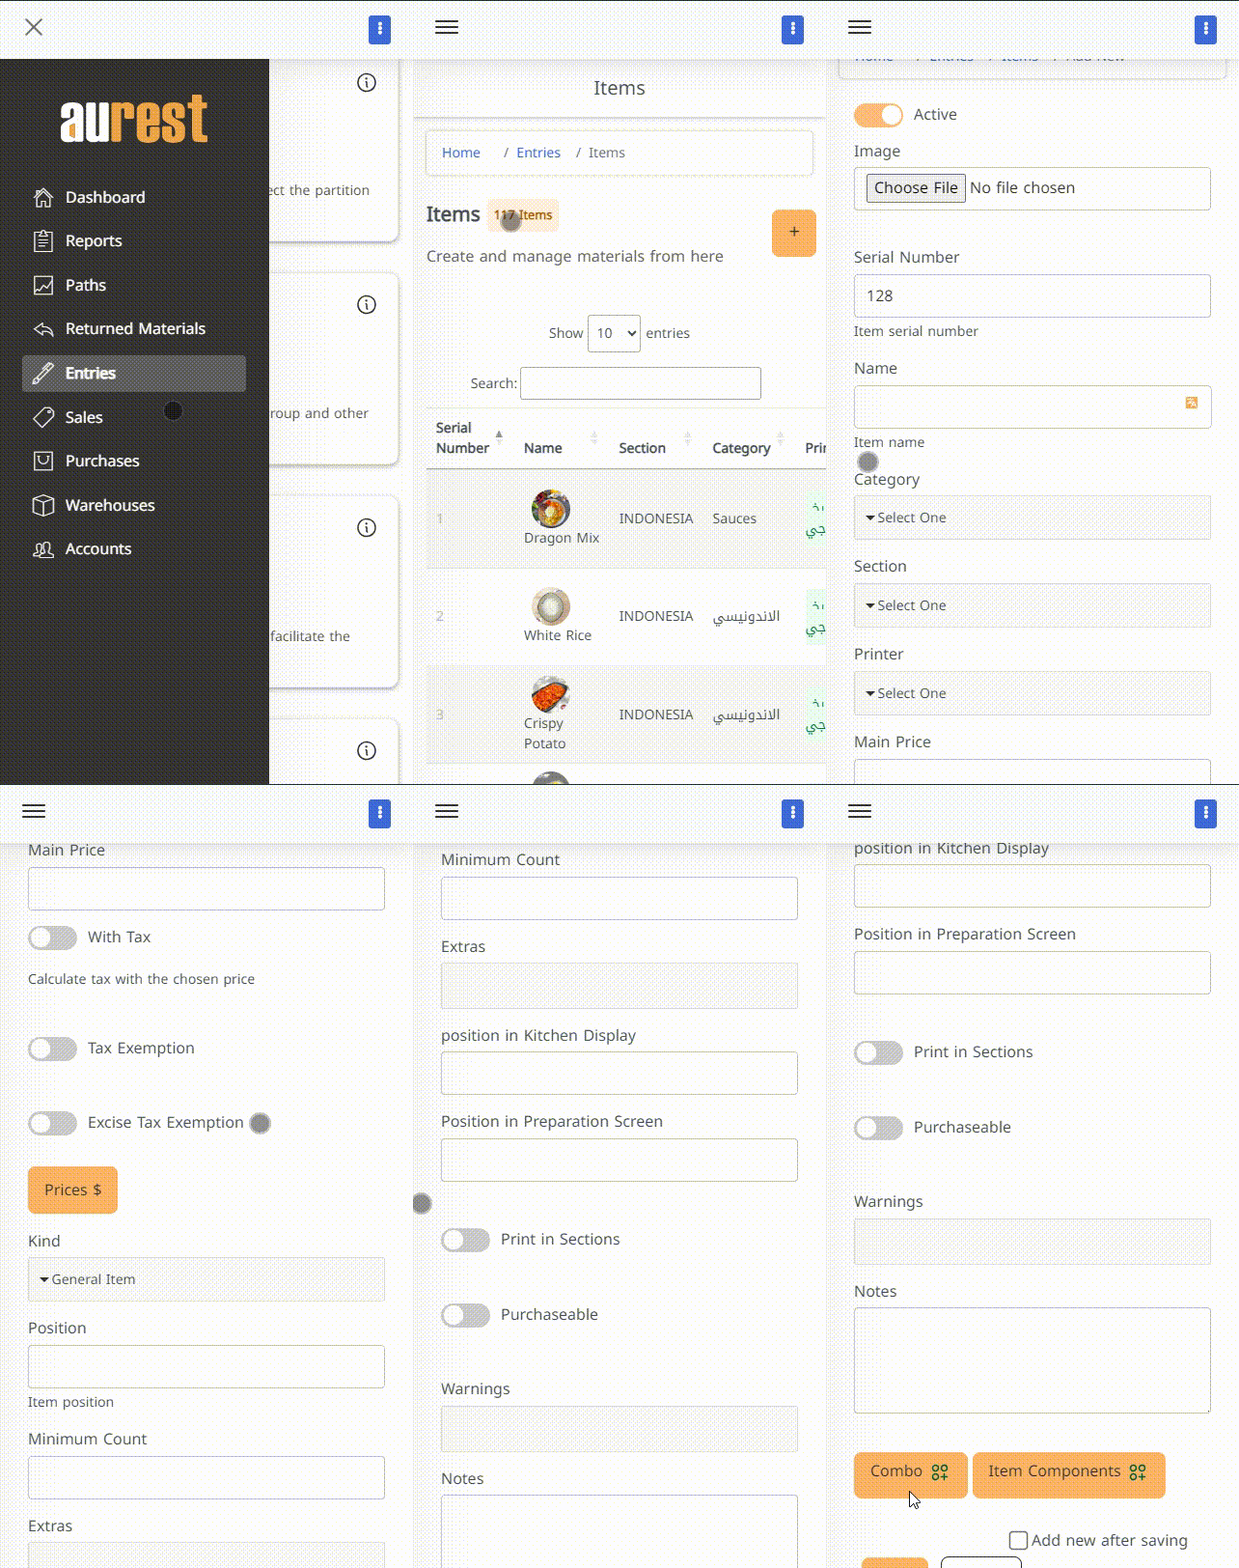
6️⃣ Items Card
✅ What is the Items Card?
It is used to add the products sold on the menu, such as chicken pizza or Coffee.
✅ Steps to Add a New Item:
-
Go to the side menu ➤ Entries ➤ Items.
-
A list of existing items will appear.
-
Click the ➕ button to add a new item.
-
Fill in the following fields:
-
Name.
-
Category.
-
Section.
-
Linked printer.
-
Main price, and define applicable tax (if any).
-
Item type (General or Mandatory).
-
Extras (if applicable).
-
Display options in kitchen or preparation screens.
-
Warnings (if applicable).
-
Combo components (if applicable).
-
Additional notes (optional).
-
-
Click ✔️ Add New After Saving.
7️⃣ Order Options
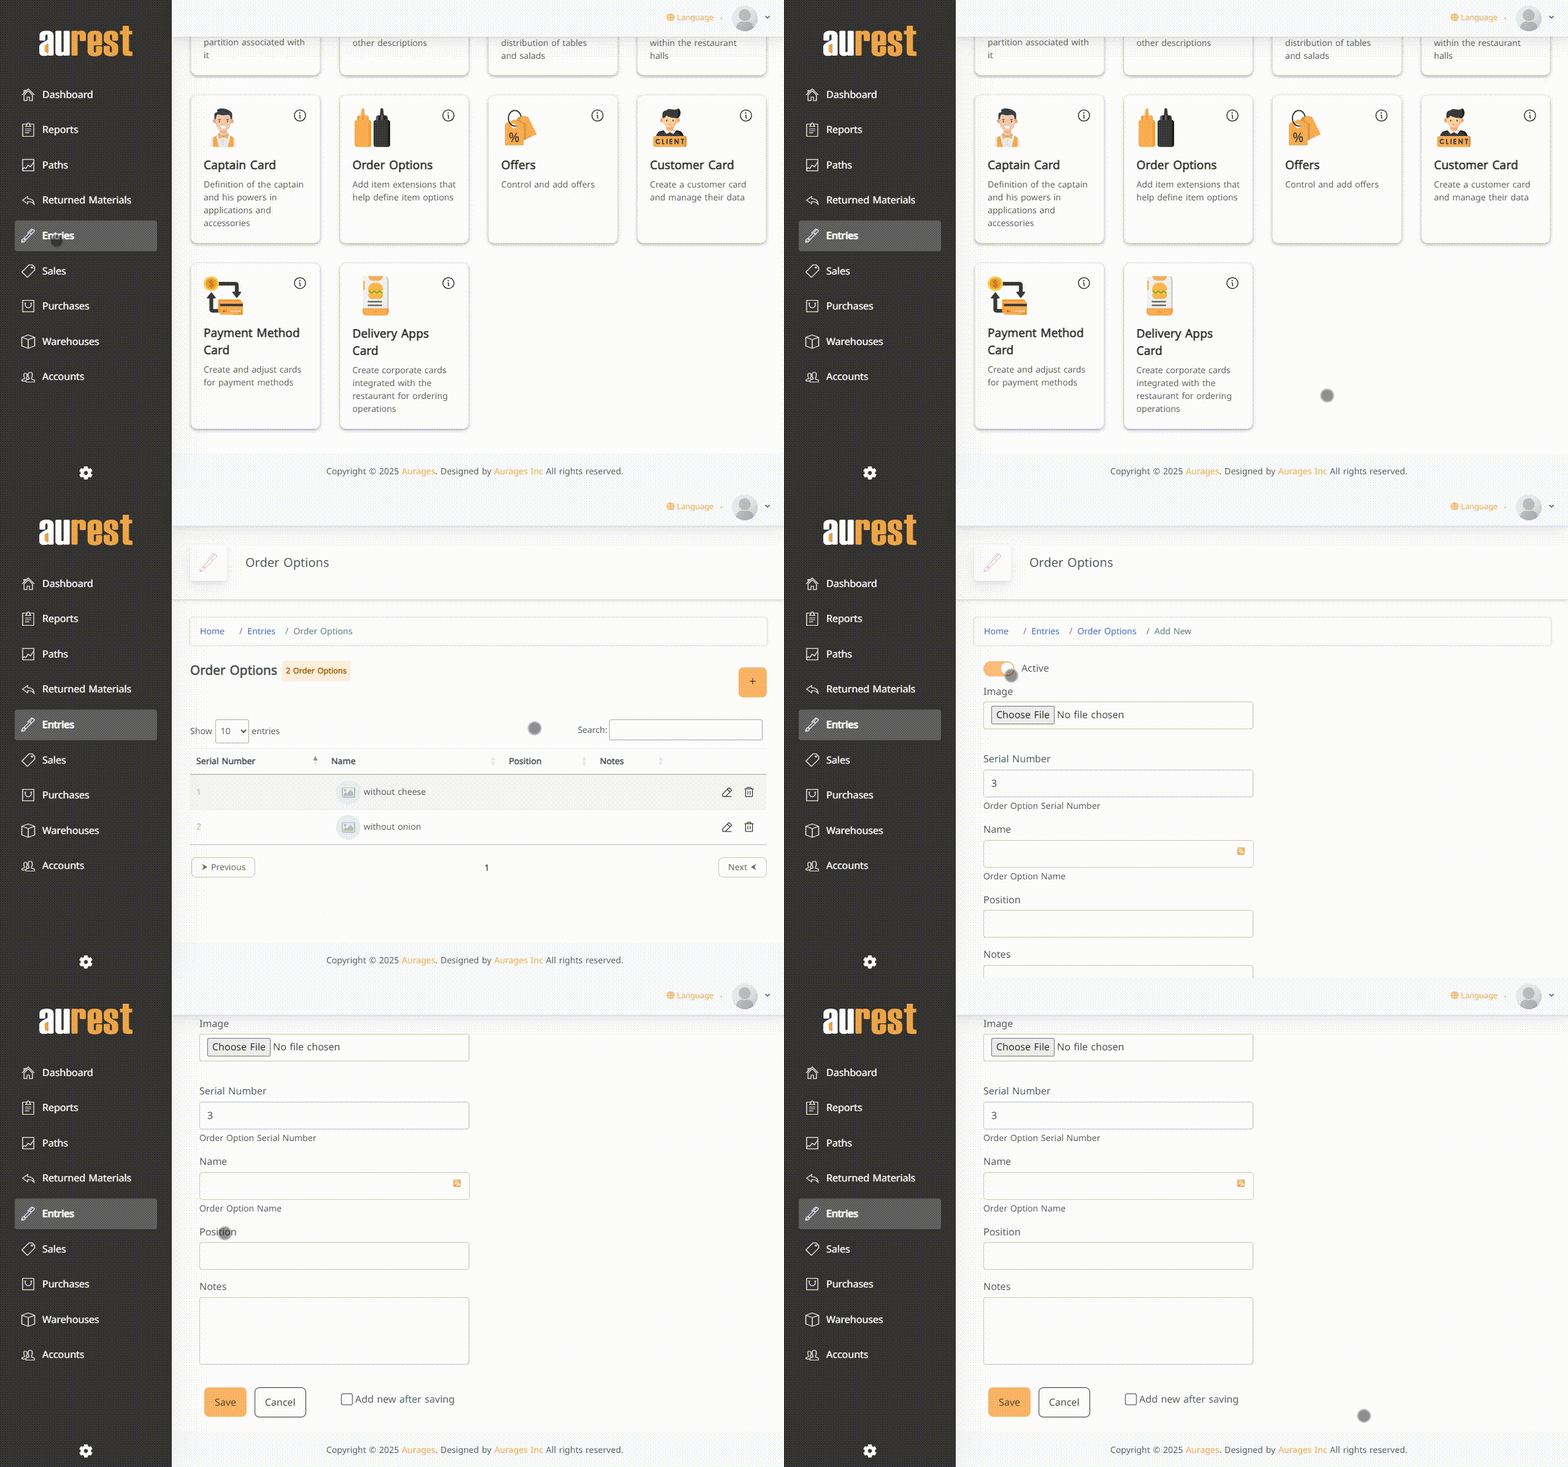
✅ What are Order Options?
They are options or extras linked to items (e.g., Extra Cheese – No Onion).
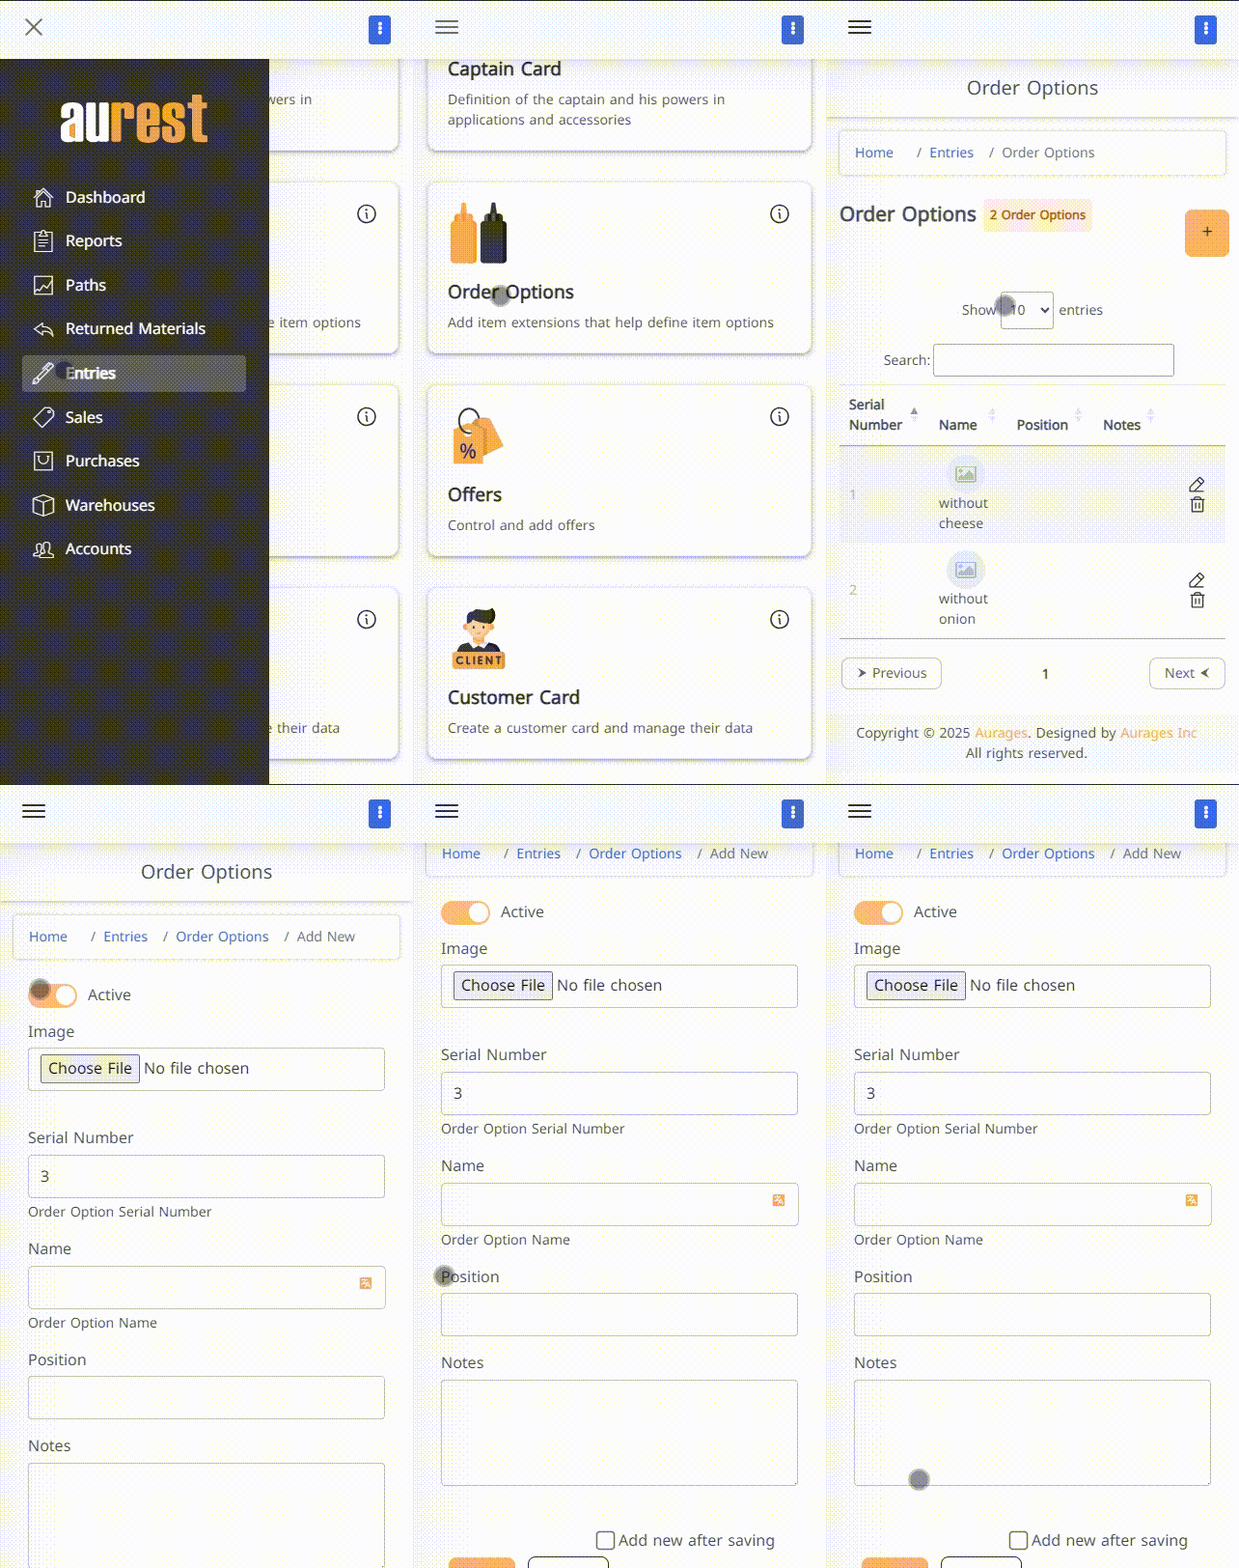
✅ Steps to Add Option:
-
From the side menu ➤ Entries ➤ Order Options.
-
Click the ➕ button to add a new Option.
-
Enter the name, display order, and notes.
-
Click ✔️ Add New After Saving.
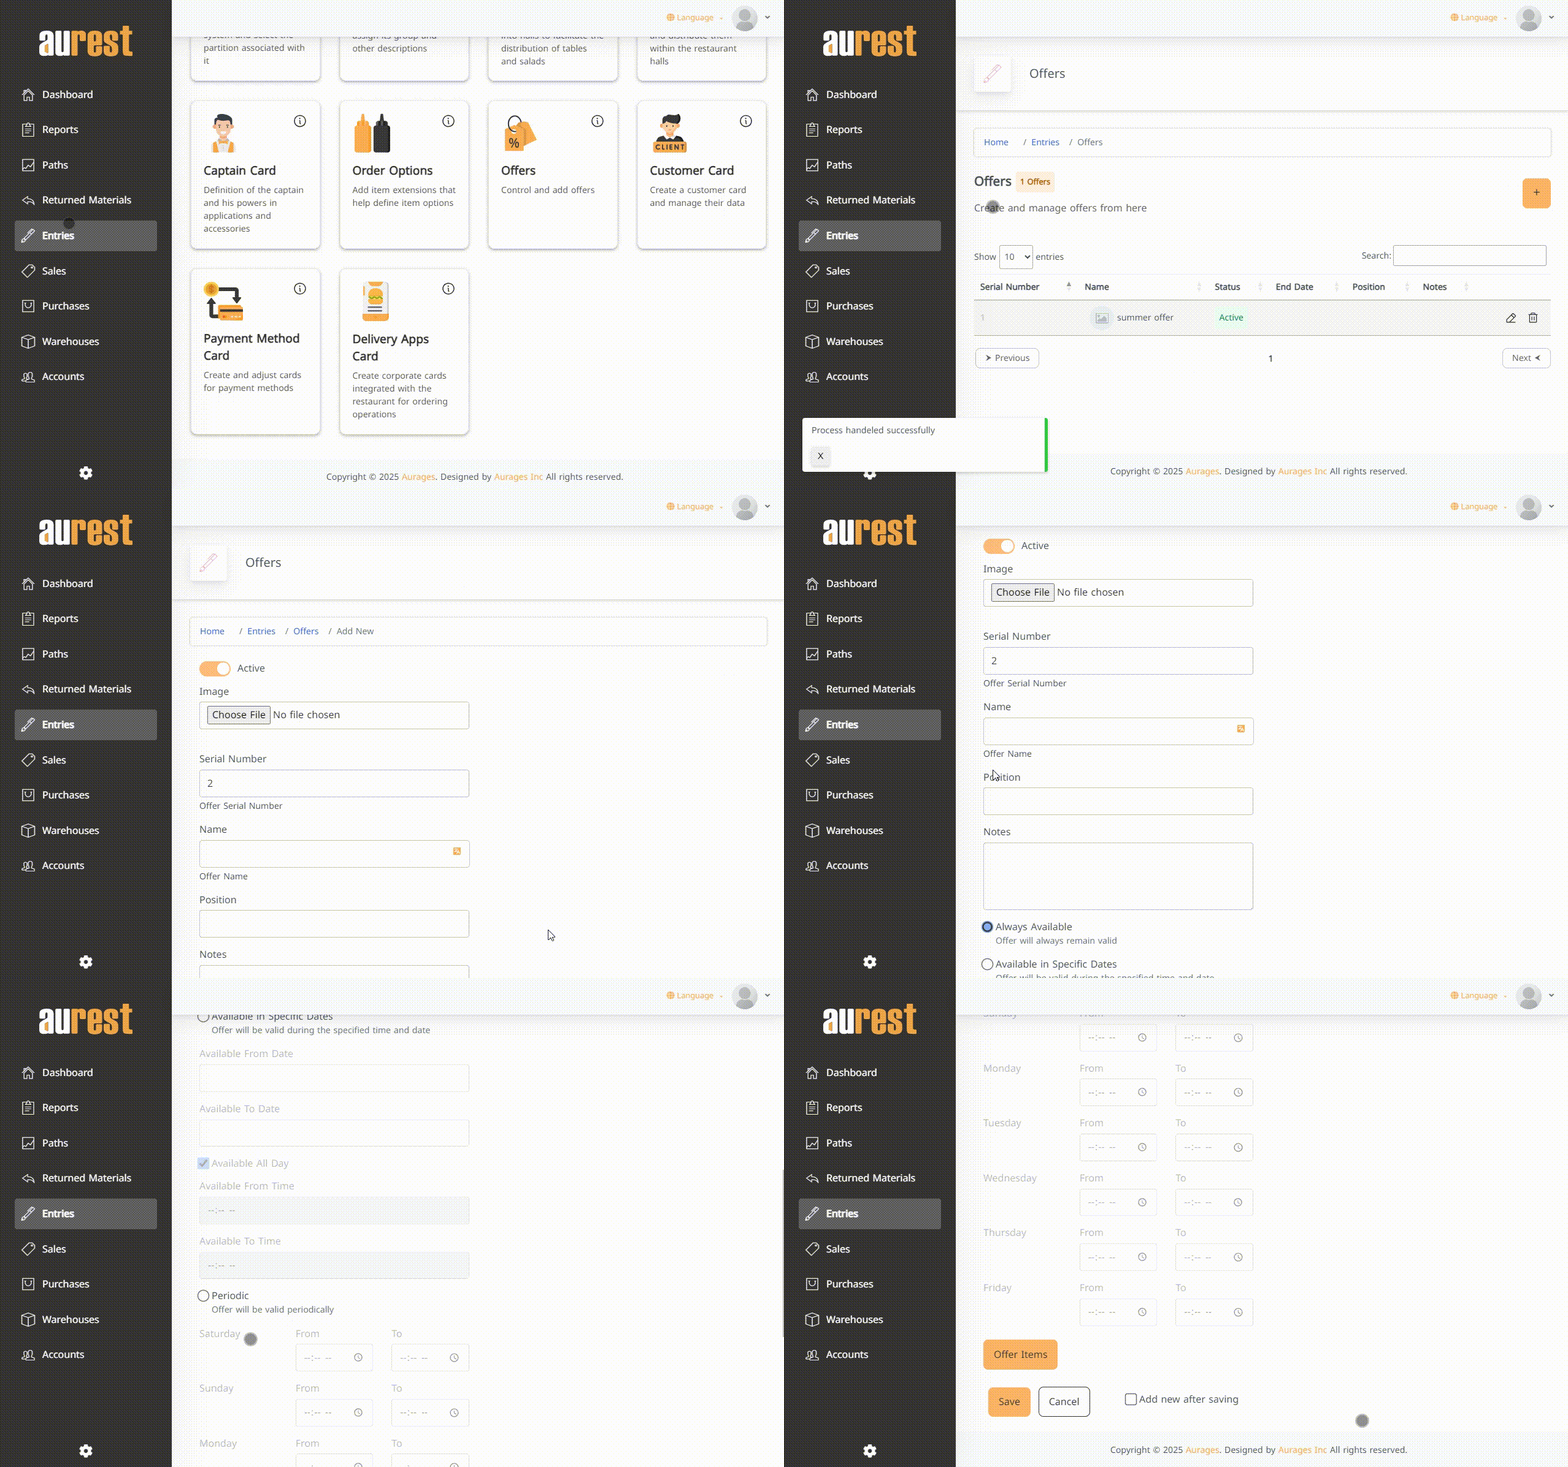
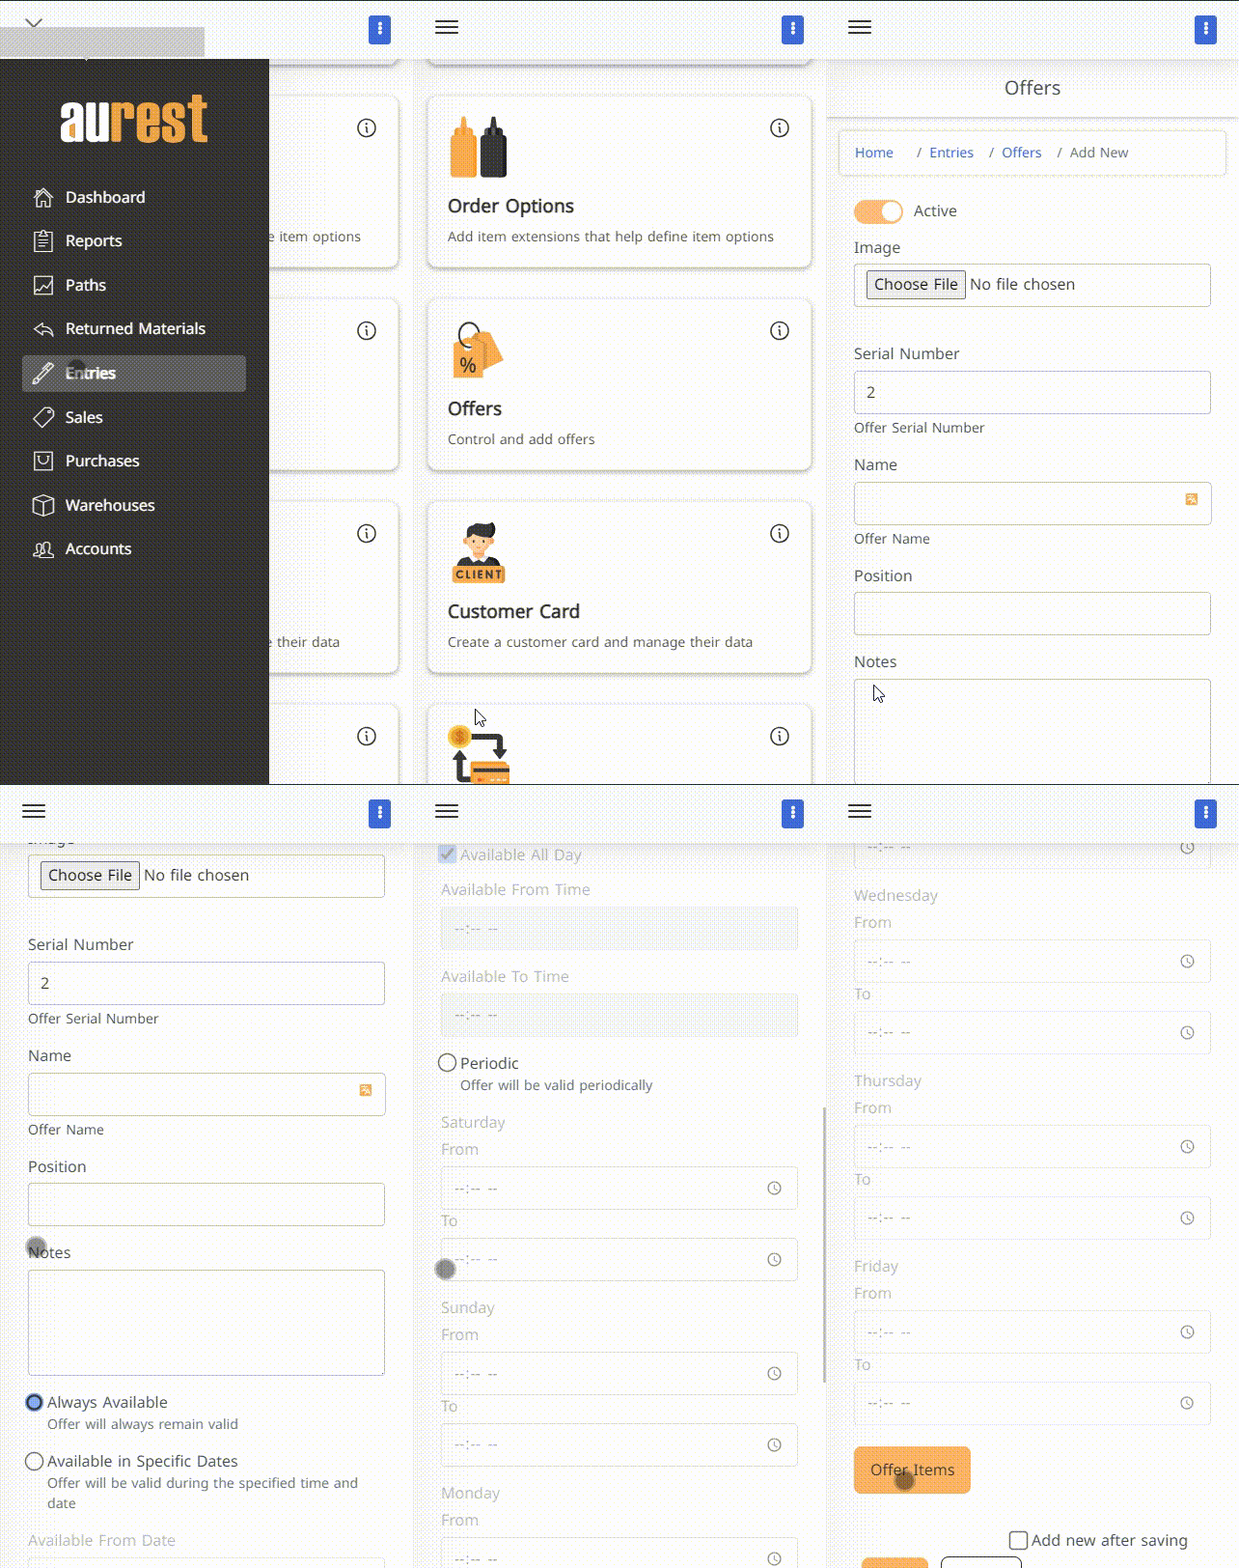
8️⃣ Offers
✅ What are Offers?
Used to create temporary or recurring discounts on selected items or the entire menu.
✅ Steps to Add a New Offer:
-
From the side menu ➤ Entries ➤ Offers.
-
Click the ➕ button to add a new offer.
-
Enter the following:
-
Offer name.
-
Activation schedule (all day or specific times).
-
Start and end dates.
-
Repetition days (if recurring).
-
Items or groups included in the offer.
-
Notes, then activate the offer.
-
-
Click ✔️ Add New After Saving.
✨ The Goal of This Phase:
-
Create a professional and well-organized menu that reflects the variety of available products.
-
Simplify the management of modifiers and offers.
-
Prepare the system to deliver an efficient and streamlined ordering experience both for dine-in and delivery services.
 العربية